Tuesday, 9 June 2015

Installing MongoDB
Import the MongoDB repository's public key.
sudo apt-key adv --keyserver hkp://keyserver.ubuntu.com:80 --recv 7F0CEB10
Create a list file for MongoDB.
echo 'deb http://downloads-distro.mongodb.org/repo/ubuntu-upstart dist 10gen' | sudo tee /etc/apt/sources.list.d/mongodb.list
Reload the local package database.
sudo apt-get update
Install the MongoDB packages:
sudo apt-get install -y mongodb-org
Notice that each package contains the associated version number.
Once the installation completes you can start, stop, and check the status of the service. It will start automatically after installation.
Try to connect to the MongoDB instance running as service:
mongo
If it is up and running, you will see something like this:
MongoDB shell version: 2.6.9
connecting to: test
Welcome to the MongoDB shell.
For interactive help, type "help".
For more comprehensive documentation, see
    http://docs.mongodb.org/
Questions? Try the support group
    http://groups.google.com/group/mongodb-user
This means the database server is running! You can exit now:
exitHow To Install a MEAN.JS Stack on an Ubuntu 14.04 Server
Introduction
MEAN.JS is a full-stack JavaScript development solution that pulls together some of the best JavaScript technologies so that you can get applications into production quickly and easily. MEAN.JS consists of MongoDB, ExpressJS, AngularJS, and Node.
In this guide, we will install each of these components onto an Ubuntu 14.04 server. This will give us the applications and structure we need to create and deploy MEAN apps easily.
Prerequisites
To begin this guide, you will need to have access to an Ubuntu 14.04 server.
You will need a non-root user account with
sudo privileges to correctly install and configure the components we will be working with.
When you are finished with the initial configuration of your server, log in with your non-root user and continue with this guide.
Download and Install MongoDB and Dependencies through Apt
Throughout this guide, we will be installing software using a number of different techniques depending on each project's requirements. The first set of installations will use
apt, Ubuntu's package management system.
Before we can begin installing software, we will be adding an additional repository with up-to-date MongoDB packages. This repository is provided by the MongoDB project itself, so it should always have recent, stable versions of MongoDB.
First, we must add the MongoDB team's key to our system's list of trusted keys. This will allow us to confirm that the packages are genuine. The following command will add the correct key to our list (if you wish, you can verify the key ID through MongoDB's official documentation):
sudo apt-key adv --keyserver hkp://keyserver.ubuntu.com:80 --recv 7F0CEB10
Now that we trust packages signed by the MongoDB maintainers, we need to add a reference to the actual repository to our
apt configuration. We can create a separate file that will be sourced by apt with the correct repository reference by typing:echo 'deb http://downloads-distro.mongodb.org/repo/ubuntu-upstart dist 10gen' | sudo tee /etc/apt/sources.list.d/mongodb.list
Our system is now configured with the new MongoDB repository. We can update our system's local package cache so that it knows about the new packages, and then we can install the software we need.
We will be installing MongoDB packages to use as our database,
git to help us with later installations, and some packages that we will need as dependencies and build dependencies for Node:sudo apt-get update
sudo apt-get install mongodb-org git build-essential openssl libssl-dev pkg-config
Once the installation is complete, we can move on to building Node.
Download, Build, and Install Node from Source
Node is a very fast-moving project that cuts releases frequently. In order to get an up-to-date copy of Node, built to run on our specific system, we will be downloading the most recent source and compiling the binary manually. This is a rather straight forward procedure.
First go to the download section of the Node website. In the main section of the page, there are download links separated by operating system, as well as a link for the source code in the upper-right corner of the downloads:

Right-click on the source code link and select "Copy link address" or whatever similar option your browser provides.
Back on your server, move into your home directory and use the
wget command to download the source code from the link you just copied. Your Node source URL will likely be different from the one shown below:cd ~
wget http://nodejs.org/dist/v0.10.33/node-v0.10.33.tar.gz
Once the file has been download, extract the archive using the
tar command:tar xzvf node-v*
This will create the directory structure that contains the source code. Move into the new directory:
cd node-v*
Since we already installed all of the Node dependencies using
apt in the last section, we can begin building the software right away. Configure and build the software using these commands:./configure
make
Once the software is compiled, we can install it onto our system by typing:
sudo make install
Node is now installed on our system (along with some helper apps). Before we continue, we can get rid of both the source code archive and the source directory to keep our system clean:
cd ~
rm -rf ~/node-v*
Install the Rest of the Components with NPM, Git, and Bower
Now that we have Node installed, we have access to the
npm package manager, which we can use to install some of the other software we require.
MEAN.JS uses a separate package manager, called
bower, to manage front-end application packages. It also uses the Grunt Task Runner to automate common tasks. Since these are management packages that should be available to assist us with every app we create, we should tell npm that we need these globally installed:sudo npm install -g bower grunt-cli
Now, we finally have all of the prerequisite packages installed. We can move onto installing the actual MEAN.JS boilerplate used to create applications. We will clone the official GitHub repository into a directory at
/opt/mean in order to get the most up-to-date version of the project:sudo git clone https://github.com/meanjs/mean.git /opt/mean
Enter the directory and tell
npm to install all of the packages the project references. We need to use sudosince we are in a system directory:cd /opt/mean
sudo npm install
Finally, since we are operating in a system directory, we need to call
bower with sudo and the --allow-root option in order to install and configure our front-end packages:sudo bower --allow-root --config.interactive=false install
See the Results
MEAN.JS is now completely installed. We can start up the sample application using the Grunt Task Runner within our project directory. This will run the application and allow it to begin accepting requests:
cd /opt/mean
grunt
Once the process starts, you can visit your server's domain name or IP address in your web browser on port "3000":
http://server_domain_or_IP:3000
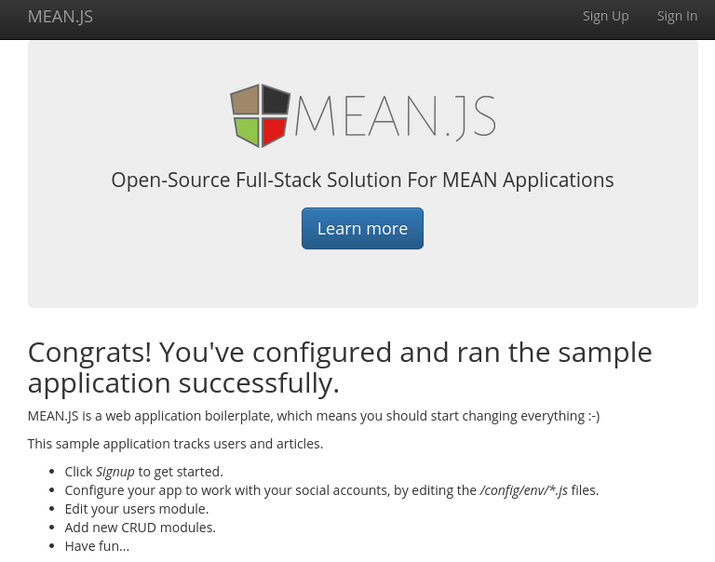
You should see the sample MEAN.JS application:
Conclusion
Now that you have the necessary components and the MEAN.JS boilerplate, you can begin making and deploying your own apps. Check out the documentation on MEAN.JS website for specific help on working with MEAN.JS.
Installing Java
First, add the repository:
sudo apt-add-repository ppa:webupd8team/java
Update your package lists again:
sudo apt-get update
Install Java:
sudo apt-get install oracle-java8-installer
When prompted to accept the license, select
<Ok> and then <Yes>.Installing Elasticsearch
Java is a prerequisite for Elasticsearch. So please install java first.
First, create a new directory where you will install the search software, and move into it.
mkdir ~/utils
cd ~/utils
Visit Elasticsearch's download page to see the latest version.
Now download the latest version of Elasticsearch. At the time of writing this article, the latest version was 1.5.0.
wget https://download.elasticsearch.org/elasticsearch/elasticsearch/elasticsearch-1.5.0.zip
Install unzip:
sudo apt-get install unzip
Unzip the archive:
unzip elasticsearch-1.5.0.zip
Navigate to the directory where you extracted it:
cd elasticsearch-1.5.0
Launch Elasticsearch by issuing the following command:
bin/elasticsearch
It will take a few seconds for Elasticsearch to start up. You'll see some startup logs as it does. Elasticsearch will now be running in the terminal window.
Note: At some point you may want to run Elasticsearch as a service so you can control it withsudo service elasticsearch restartand similar commands; see this tutorial aboutUpstart for tips. Alternately, you can install Elasticsearch from Ubuntu's repositories, although you'll probably get an older version.
Keep this terminal open. Make another SSH connection to your server in another terminal window and check if your instance is up and running:
curl -XGET http://localhost:9200
9200 is the default port for Elasticsearch. If everything goes well, you will see output similar to that shown below:
{
"status" : 200,
"name" : "Northstar",
"cluster_name" : "elasticsearch",
"version" : {
"number" : "1.5.0",
"build_hash" : "927caff6f05403e936c20bf4529f144f0c89fd8c",
"build_timestamp" : "2015-03-23T14:30:58Z",
"build_snapshot" : false,
"lucene_version" : "4.10.4"
},
"tagline" : "You Know, for Search"
}
Note: For the later part of this article, when you will be copying data, make sure that Elasticsearch is running (and on port 9200).
Monday, 8 June 2015
How To Set Up a Node.js Application for Production on Ubuntu 14.04
Introduction
Node.js is an open source Javascript runtime environment for easily building server-side and networking applications. The platform runs on Linux, OS X, FreeBSD, and Windows, and its applications are written in JavaScript. Node.js applications can be run at the command line but we will teach you how to run them as a service, so they will automatically restart on reboot or failure, so you can use them in a production environment.
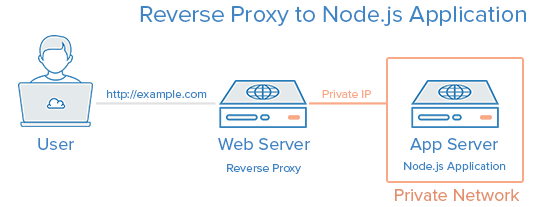
In this tutorial, we will cover setting up a production-ready Node.js environment that is composed of two Ubuntu 14.04 servers; one server will run Node.js applications managed by PM2, while the other will provide users with access to the application through an Nginx reverse proxy to the application server.
Prerequisites
This guide uses two servers with private networking (in the same datacenter). We will refer to them by the following names:
- app: The server where we will install Node.js runtime, your Node.js application, and PM2
- web: The server where we will install the Nginx web server, which will act as a reverse proxy to your application. Users will access this server's public IP address to get to your Node.js application.
It is possible to use a single server for this tutorial, but you will have to make a few changes along the way. Simply use the localhost IP address, i.e.
127.0.0.1, wherever the app server's private IP address is used.
Here is a diagram of what your setup will be after following this tutorial:
Before you begin this guide, you should have a regular, non-root user with
sudo privileges configured on both of your servers--this is the user that you should log in to your servers as. You can learn how to configure a regular user account by following steps 1-4 in our initial server setup guide for Ubuntu 14.04.
If you want to be able to access your web server via a domain name, instead of its public IP address, purchase a domain name then follow these tutorials:
- How To Set Up a Host Name with DigitalOcean
- How to Point to DigitalOcean Nameservers From Common Domain Registrars
Let's get started by installing the Node.js runtime on the app server.
Install Node.js
We will build and install the latest stable release of Node.js, on the app server.
On the app server, let's update the apt-get package lists with this command:
sudo apt-get update
Then use
apt-get to install Node.js build dependencies:sudo apt-get install -y build-essential openssl libssl-dev pkg-config
The next step is download the source code for the latest release of Node.js.
Go to the Node.js Downloads page and find the Source Code download link. Right-click it, and copy its link address to your clipboard.
Change to your home directory and download the Node.js source with
wget. Paste the download link in place of the highlighted part:cd ~
wget http://nodejs.org/dist/latest/node-v0.10.33.tar.gz
Now extract the tar archive you just downloaded with this command:
tar xvf node-v*
Change to the new directory that was created by extracting the archive:
cd node-v*
Configure and build Node.js with the following commands:
./configure
make
Now, to install Node.js, run this command:
sudo make install
If you want to delete the Node.js source code that you downloaded, change to your home directory and use this
rm command:cd ~
rm -rf node-v*
The Node.js runtime is now installed, and ready to run an application! Let's write a Node.js application.
Create Node.js Application
Now we will create a Hello World application that simply returns "Hello World" to any HTTP requests. This is a sample application that will help you get your Node.js set up, which you can replace it with your own application--just make sure that you modify your application to listen on the appropriate IP addresses and ports.
Because we want our Node.js application to serve requests that come from our reverse proxy server, web, we will utilize our app server's private network interface for inter-server communication. Look up your appserver's private network address.
If you are using a DigitalOcean droplet as your server, you may look up the server's private IP address through the Metadata service. On the app server, use the
curl command to retrieve the IP address now:curl -w "\n" http://169.254.169.254/metadata/v1/interfaces/private/0/ipv4/address
You will want to copy the output (the private IP address), as it will be used to configure our Node.js application.
Hello World Code
Next, create and open your Node.js application for editing. For this tutorial, we will use
vi to edit a sample application called hello.js:vi hello.js
Insert the following code into the file, and be sure to substitute the app server's private IP address for both of highlighted
APP_PRIVATE_IP_ADDRESS items. If you want to, you may also replace the highlighted port, 8080, in both locations (be sure to use a non-admin port, i.e. 1024 or greater):var http = require('http');
http.createServer(function (req, res) {
res.writeHead(200, {'Content-Type': 'text/plain'});
res.end('Hello World\n');
}).listen(8080, 'APP_PRIVATE_IP_ADDRESS');
console.log('Server running at http://APP_PRIVATE_IP_ADDRESS:8080/');
Now save and exit.
This Node.js application simply listens on the specified IP address and port, and returns "Hello World" with a
200 HTTP success code. This means that the application is only reachable from servers on the same private network, such as our web server.Test Application (Optional)
If you want to test if your application works, run this
node command on the app server:node hello.js
Note: Running a Node.js application in this manner will block additional commands until the application is killed by pressing
CTRL+C.
In order to test the application, open another terminal session and connect to your web server. Because the web server is on the same private network, it should be able to reach the private IP address of the appserver using
curl. Be sure to substitute in the app server's private IP address forAPP_PRIVATE_IP_ADDRESS, and the port if you changed it:curl http://APP_PRIVATE_IP_ADDRESS:8080
If you see the following output, the application is working properly and listening on the proper IP address and port:
Hello World
If you do not see the proper output, make sure that your Node.js application is running, and configured to listen on the proper IP address and port.
On the app server, be sure to kill the application (if you haven't already) by pressing
CTRL+C.Install PM2
Now we will install PM2, which is a process manager for Node.js applications. PM2 provides an easy way to manage and daemonize applications (run them as a service).
We will use Node Packaged Modules (NPM), which is basically a package manager for Node modules that installs with Node.js, to install PM2 on our app server. Use this command to install PM2:
sudo npm install pm2 -g
Manage Application with PM2
PM2 is simple and easy to use. We will cover a few basic uses of PM2.
Start Application
The first thing you will want to do is use the
pm2 start command to run your application, hello.js, in the background:pm2 start hello.js
This also adds your application to PM2's process list, which is outputted every time you start an application:
┌──────────┬────┬──────┬──────┬────────┬───────────┬────────┬────────────┬──────────┐
│ App name │ id │ mode │ PID  │ status │ restarted │ uptime │     memory │ watching │
├──────────┼────┼──────┼──────┼────────┼───────────┼────────┼────────────┼──────────┤
│ hello    │ 0  │ fork │ 5871 │ online │         0 │ 0s     │ 9.012 MB   │ disabled │
└──────────┴────┴──────┴──────┴────────┴───────────┴────────┴────────────┴──────────┘
As you can see, PM2 automatically assigns an App name (based on the filename, without the
.jsextension) and a PM2 id. PM2 also maintains other information, such as the PID of the process, its current status, and memory usage.
Applications that are running under PM2 will be restarted automatically if the application crashes or is killed, but an additional step needs to be taken to get the application to launch on system startup (boot or reboot). Luckily, PM2 provides an easy way to do this, the
startup subcommand.
The
startup subcommand generates and configures a startup script to launch PM2 and its managed processes on server boots. You must also specify the platform you are running on, which is ubuntu, in our case:pm2 startup ubuntu
The last line of the resulting output will include a command (that must be run with superuser privileges) that you must run:
[PM2] You have to run this command as root
[PM2] Execute the following command :
[PM2] sudo env PATH=$PATH:/usr/local/bin pm2 startup ubuntu -u sammy
Run the command that was generated (similar to the highlighted output above) to set PM2 up to start on boot (use the command from your own output):
sudo env PATH=$PATH:/usr/local/bin pm2 startup ubuntu -u sammy
Other PM2 Usage (Optional)
PM2 provides many subcommands that allow you to manage or look up information about your applications. Note that running
pm2 without any arguments will display a help page, including example usage, that covers PM2 usage in more detail than this section of the tutorial.
Stop an application with this command (specify the PM2
App name or id):pm2 stop example
Restart an application with this command (specify the PM2
App name or id):pm2 restart example
The list of applications currently managed by PM2 can also be looked up with the
list subcommand:pm2 list
More information about a specific application can be found by using the
info subcommand (specify the PM2 App name or id)::pm2 info example
The PM2 process monitor can be pulled up with the
monit subcommand. This displays the application status, CPU, and memory usage:pm2 monit
Now that your Node.js application is running, and managed by PM2, let's set up the reverse proxy.
Set Up Reverse Proxy Server
Now that your application is running, and listening on a private IP address, you need to set up a way for your users to access it. We will set up an Nginx web server as a reverse proxy for this purpose. This tutorial will set up an Nginx server from scratch. If you already have an Nginx server setup, you can just copy the
location block into the server block of your choice (make sure the location does not conflict with any of your web server's existing content).
On the web server, let's update the apt-get package lists with this command:
sudo apt-get update
Then install Nginx using apt-get:
sudo apt-get install nginx
Now open the default server block configuration file for editing:
sudo vi /etc/nginx/sites-available/default
Delete everything in the file and insert the following configuration. Be sure to substitute your own domain name for the
server_name directive (or IP address if you don't have a domain set up), and the app server private IP address for the APP_PRIVATE_IP_ADDRESS. Additionally, change the port (8080) if your application is set to listen on a different port:server {
listen 80;
server_name example.com;
location / {
proxy_pass http://APP_PRIVATE_IP_ADDRESS:8080;
proxy_http_version 1.1;
proxy_set_header Upgrade $http_upgrade;
proxy_set_header Connection 'upgrade';
proxy_set_header Host $host;
proxy_cache_bypass $http_upgrade;
}
}
This configures the web server to respond to requests at its root. Assuming our server is available at
example.com, accessing http://example.com/ via a web browser would send the request to the application server's private IP address on port 8080, which would be received and replied to by the Node.js application.
You can add additional
location blocks to the same server block to provide access to other applications on the same web server. For example, if you were also running another Node.js application on the appserver on port 8081, you could add this location block to allow access to it viahttp://example.com/app2: location /app2 {
proxy_pass http://APP_PRIVATE_IP_ADDRESS:8081;
proxy_http_version 1.1;
proxy_set_header Upgrade $http_upgrade;
proxy_set_header Connection 'upgrade';
proxy_set_header Host $host;
proxy_cache_bypass $http_upgrade;
}
Once you are done adding the location blocks for your applications, save and exit.
On the web server, restart Nginx:
sudo service nginx restart
Assuming that your Node.js application is running, and your application and Nginx configurations are correct, you should be able to access your application via the reverse proxy of the web server. Try it out by accessing your web server's URL (its public IP address or domain name).
Conclusion
Congratulations! You now have your Node.js application running behind an Nginx reverse proxy. This reverse proxy setup is flexible enough to provide your users access to other applications or static web content that you want to share. Good luck with your Node.js development!
Unlock User Account
Account locked due to 14 failed logins
pam_tally2 -u <username> --reset
Unlock user account
passwd -u <username>
Reset User password
passwd <username>
Subscribe to:
Posts (Atom)